
Quick Answer
What a Technician Needs to See in Your Photos
Send three photos: one close-up of the dent, one from a few feet back showing the whole panel, and one taken at a low angle so the dent appears in the reflection. Include the year, make, and model, and say where on the vehicle the damage is. The angled shot matters most — it is the only one that shows depth, and depth is what sets the price.
The Three Shots
One close-up. Fill the frame with the dent and about a hand's width of panel around it. This shows the character of the damage — whether it is a round ding, a sharp crease, or a cluster of hail hits — and whether the finish is intact.
One from a few feet back. Step away far enough to capture the whole panel and the body lines running through it. This answers questions the close-up cannot: which panel is it, how close to an edge, is there a body line running through the dent, is there bracing behind that area. A dent two inches from a door edge is a different repair from the same dent in the middle of the door.
One angled so the dent shows in the reflection. Crouch down and shoot along the panel rather than straight at it, so a light source — a window, the sky, a garage door opening — reflects off the paint and travels across the damage. This is the shot that does the real work, and it is the one most people skip.
Why the Angled Shot Decides the Price
A photograph taken square-on flattens everything. Paint has no texture to a camera pointed straight at it, so a deep crease and a shallow ding can look nearly identical in a head-on shot.
Reflections solve that. When a straight edge — the line of a roof, a window frame, the horizon — reflects across a panel, it bends wherever the metal is no longer flat. The size of that bend is the depth of the dent. That is exactly how a technician reads damage in person, using a light board to throw a controlled line across the panel, and an angled phone photo is a rough version of the same instrument.
Depth is what sets the price, along with access and leverage behind the panel. Our cost guide explains why a small dent in a difficult location can cost more than a larger one in an easy spot — which is also why an accurate photo protects you from a quote that has to be revised later.
Lighting, Without Any Equipment
Outdoors on an overcast day is close to ideal: the whole sky becomes one large soft reflector and the panel reads evenly. Direct midday sun is the worst case — it blows out the highlight and hides the damage inside the glare.
In a garage, open the door and park so the opening reflects along the panel, then shoot from the side. At night, a doorway or a strip light overhead works if you position yourself so its reflection crosses the dent.
Two practical habits: wipe the panel first, because dust and water spots read as damage and make a dent look worse than it is; and turn the flash off. A flash fires straight down the lens axis, which is the one angle guaranteed to hide depth.
If the Paint Looks Cracked or Scraped, Photograph That Closely
This is the single most consequential thing a photo can tell us, because paint decides whether the repair is possible at all. Paintless dent repair restores shape, not finish — if the clear coat cracked, no amount of skill brings it back, and the honest answer is a body shop.
So if you see anything that might be a crack, a chip, or a scrape, get close to it. Fill the frame. A hairline in the clear coat at the deepest point of a dent is often invisible from three feet and obvious from six inches.
It matters more than usual in winter. Below roughly fifty degrees the clear coat becomes brittle and is far more likely to crack at the moment of impact, which means a modest-looking cold-weather ding can already be unrepairable. Our guide on why temperature decides whether a dent can be fixed covers the rule, and if the paint did crack you will be told up front rather than sold a repair that cannot finish clean.
If Someone Has Already Tried to Fix It
Say so, and photograph it the same way. A previous attempt changes the assessment and the price, and hiding it does not help — an experienced technician sees it in the first few seconds anyway.
What to capture: the original dent area, any rippled or dimpled texture around it, and any glue residue or tab marks left behind. If a bridge-style puller was used, photograph the two spots either side of the dent where the feet pressed, because that is frequently where the new damage is. Our guides on DIY kits and how to spot a bad repair explain what those marks mean.
The good news is that most of it is recoverable. If the paint and clear coat survived, a marred panel can usually still be finished properly — it just costs more than the original job would have, because the technician is correcting someone else's work first.
What to Send With the Photos
Text everything to 704-713-4663 in one message: the three photos, the year, make and model, and a sentence saying where the damage is — driver's front door, tailgate, hood near the windscreen. Vehicle details matter because panel construction differs enormously between models, and whether a panel is aluminum or steel changes the technique. Our aluminum repair page covers why.
If there are several dents, photograph each one and say how many there are in total. Multiple dings on the same panel are cheaper together than as separate visits, so it is worth showing the whole side rather than only the worst one.
Estimates are free and usually come back within minutes during business hours. If the photos leave a genuine question unanswered you will be asked for one more rather than given a vague range — which is the whole point of getting them right the first time.
Real Repairs, Before and After
Photographs and clips from actual repairs. Watch the reflection rather than the dent — a panel is judged by whether reflected lines run straight across it, which is the same thing a technician reads off a light board.
Reading the Panel With a Light Board
Mint Hill, NC · July 2026
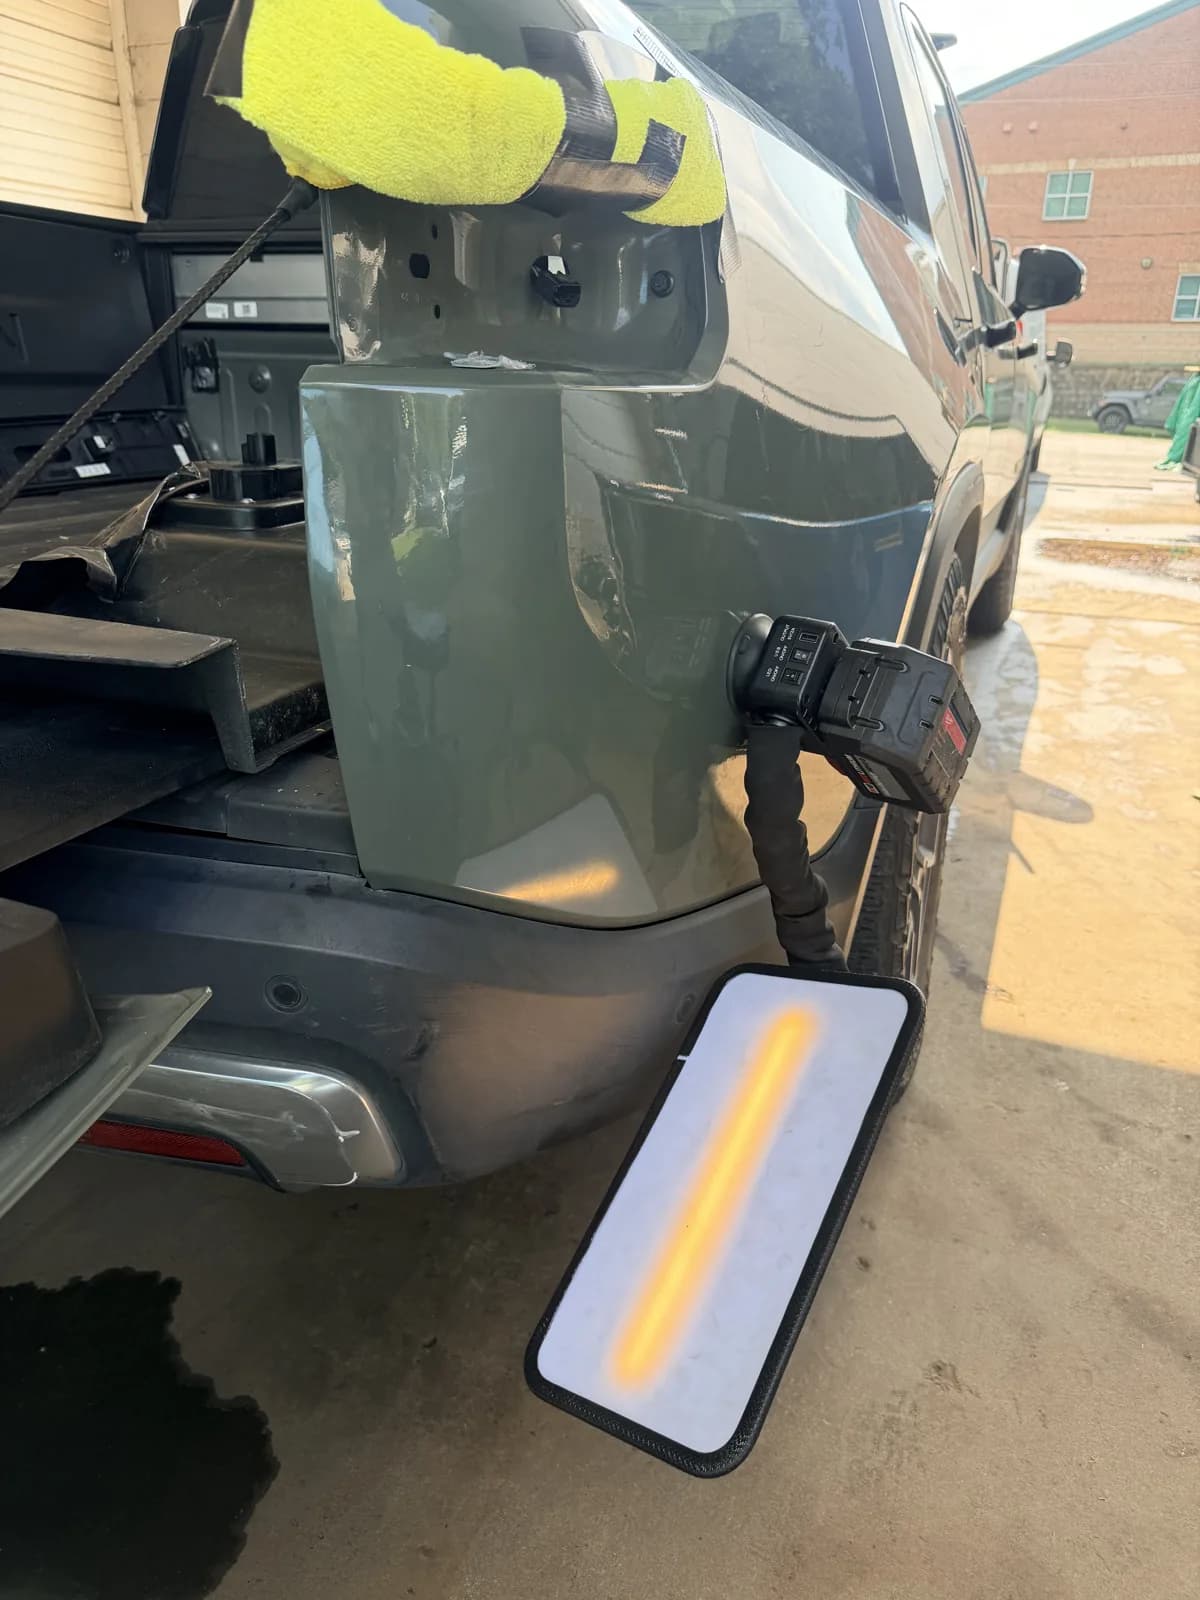
The lined light board is how a technician actually sees the dent. It exaggerates surface distortion so the true footprint of the damage — always larger than it looks in daylight — becomes readable.
Frequently Asked Questions
How many photos should I send?
Three is the working minimum: a close-up, a wider shot of the whole panel, and an angled shot showing the dent in the reflection. Add more if there are several dents or if the paint looks damaged.
Can you really quote from a photo?
For most single dents, yes — a clear set of photos plus the year, make and model is usually enough for a firm number. Complicated creases, damage near an edge, and anything with questionable paint may need an in-person look, and you will be told that rather than given a number that changes later.
Does the phone camera matter?
No. Any modern phone is more than adequate. Angle and lighting matter far more than the camera — a well-angled photo on an old phone beats a head-on photo on a new one every time.
Should I use the flash?
No. A flash fires straight down the lens axis, which flattens the panel and hides the depth of the dent. Use available light and shoot at an angle instead.
What if I can't get a reflection to show up?
Send what you have and say so. Some colors — particularly flat whites and light silvers — reflect poorly, and a technician knows to compensate. It is better to send an imperfect photo than to wait.
Related Services
Expert paintless dent repair in Charlotte, NC.
Mobile paintless dent repair anywhere in greater Charlotte.
Door ding repair in Charlotte, NC.
Hail damage repair in Charlotte, NC with paintless dent repair — the insurer-preferred method.
Keep Reading
A transparent breakdown of how paintless dent repair is priced, written by the technician who sets the prices. Why access and leverage behind the panel matter more than dent size, plus depth, position, aluminum versus steel, creases versus round dents, multi-dent work, how hail pricing runs through insurance, and why a photo is enough for an accurate quote.
Temperature is usually treated as a scheduling detail in dent repair. Travis treats it as the thing that decides whether a panel is repairable at all, because the temperature at the moment of impact determines whether the clear coat survived. This guide covers the 50°F threshold, why alarming summer dents often repair beautifully, and how cold-weather repairs are actually performed.
A botched paintless dent repair has a look, and technicians have names for it. This guide covers what a bad repair actually looks like on the panel, the economic reason it happens, the line between damage that can still be corrected and damage that now needs a body shop, and why collecting the cheapest quote is the single riskiest thing an owner can do.
Bridge-style glue pullers are sold as a cheap fix and usually produce a more expensive problem. This guide covers what the kits mechanically do to a panel, why the gap between amateur and professional is skill rather than equipment, and the most honest evidence available for how long the skill actually takes to build.
Got a ding? Give me a ring.
Text a photo of your dent to 704-713-4663 for a free estimate — usually within minutes during business hours.
Rated 4.9 out of 5 across 103 Google reviews · Since 2001 · Shop in Mint Hill · Mobile across Charlotte